
Just going to go straight into the commands. This assumes you’ve configured your DNS and started a Digital Ocean droplet and have created a root-empowered user. If you’re looking to start using Digital Ocean, get $100 credit with Digital Ocean (Referral link, win-win). This example was performed on a 1 CPU, 2 GB RAM droplet.
Create a Swap File\
sudo fallocate -l 4G /swapfile
sudo chmod 600 /swapfile
sudo mkswap /swapfile
sudo swapon /swapfile
echo '/swapfile none swap sw 0 0' | sudo tee -a /etc/fstab
sudo swapon --show
Percona Server for MySQL 8.0.13-3
Fetch, install, and enable the repository then install the server package.
wget https://repo.percona.com/apt/percona-release_latest.$(lsb_release -sc)_all.deb
sudo dpkg -i percona-release_latest.$(lsb_release -sc)_all.deb
sudo percona-release setup ps80
sudo apt-get update -y && sudo apt-get upgrade -y
sudo apt-get install percona-server-server
sudo update-rc.d mysql defaults
With WordPress 5.0, the MySQL connector does not support caching_sha2 authentication. You’ll have to use “mysql_native_password.”
CREATE user 'example'@'localhost' identified with mysql_native_password by 'example 123';
grant all privileges on example.* to 'example'@'localhost';
How you optimize your MySQL installation really depends on your usage. For WordPress, I would at least allocate 256MB for the buffer pool. Let the site run for a few weeks and figure out how to optimize it then.
innodb_buffer_pool_size = 256MInstall PHP 7.3.0-2
sudo add-apt-repository ppa:ondrej/php
sudo apt-get update
sudo apt-get install php7.3
sudo apt-get install php7.3-fpm php7.3-cli php7.3-mysql php7.3-gd php7.3-imagick php-redis php7.3-recode php7.3-tidy php7.3-xmlrpc php7.3-mbstring php7.3-xml php-xmlrpc
sudo vim /etc/php/7.3/fpm/pool.d/www.conf This setting really depends on how much ram you have available. Find out how much each PHP process takes up and divide the amount of free memory by that number.
ps --no-headers -o "rss,cmd" -C php-fpm7.3 | awk '{ sum+=$1 } END { printf ("%d%s\n", sum/NR/1024,"Mb") }'In my case, I have about 1,256MB free, each process runs about 110MB, so that gives 11 to be safe.
pm = dynamic
pm.process_idle_timeout = 10s
pm.max_children = 11
pm.start_servers = 5
pm.min_spare_servers = 5
pm.max_spare_servers = 10
The default values for php.ini are a bit low for themes and performance.
sudo vim /etc/php/7.3/fpm/php.ini
upload_max_filesize = 100M
memory_limit = 256M
Install Nginx
sudo apt-get purge apache2
sudo apt autoremove
sudo apt-get install fail2ban
sudo apt install nginx
sudo ufw app list
sudo ufw allow 'OpenSSH'
sudo ufw allow 'Ngninx Full'
sudo ufw status
sudo systemctl nginx status
curl example.com
The relationship between Nginx and PHP-FPM workers and processes…
There’s a lot of confusion between Nginx workers and php-fpm workers. First of all, all workers are processes – and all processes consume memory. The amount of memory that a process could take (such as php-fpm7.3), depends on your CMS/application (WordPress plugins, themes, etc). I’ve had some WordPress sites take over 100MB of memory per php-fpm worker.
A single Nginx worker could asynchronously handle over 1,000 requests per second. When php-fpm receives a request from Nginx, it’ll have to allocate memory for a new php-fpm process or use an existing one. So even if php-fpm complains with “[pool www] server reached pm.max_children setting (11), consider raising it,” you’re limited by the amount of RAM you have. If you increase beyond that – your server will go down with heavy traffic.
So the number of Nginx workers are static (from your configuration) but the number of php-fpm workers you have will vary depending on the number of requests and generally the amount of RAM you have. So even though Nginx could handle 1,000 requests, it doesn’t mean your server can.
Setup Server Block (Virtual Host)
sudo mkdir -p /var/www/example.com/
sudo chown -R www-data:www-data /var/www/example.com/
sudo chmod -R 755 /var/www/example.com/
sudo vim /etc/nginx/sites-available/example.com
sudo wget https://wordpress.org/latest.zip
sudo apt-get install unzip -y
sudo unzip latest.zip
sudo rsync -av wordpress/* /var/www/example.com/
sudo chown -R www-data:www-data /var/www/example.com/
sudo chmod -R 755 /var/www/example.com
server {
        listen 80;
        listen [::]:80;

        client_max_body_size 25m;

        root /var/www/example.com;
        index index.php index.html index.htm index.nginx-debian.html;

        server_name example.com www.example.com;

        location / {
                try_files $uri $uri/ =404 /index.php?$args;
        }

        location ~ \.php$ {
          include snippets/fastcgi-php.conf;
          fastcgi_pass unix:/var/run/php/php7.3-fpm.sock;
        }
}
sudo ln -s /etc/nginx/sites-available/example.com /etc/nginx/sites-enabled/
sudo systemctl reload nginx
#uncomment server_names_hash_bucket_size in /etc/nginx/nginx.conf
server_names_hash_bucket_size 64;
sudo nginx -tsudo systemctl restart nginx
At this point, you should see the WordPress installation page.
Enable HTTP Strict Transport Security (HSTS) and Gzip
It’s recommended to use HSTS even if you redirect. Browsers tend to cache 301 responses. Edit your /etc/nginx/nginx.conf file and add the following add_header section:
worker_processes [# of processors on your server];
server_tokens off; #great for security reasons

location ~ /\. {
  access_log off;
  log_not_found off;
  deny all;
}

include /etc/nginx/conf.d/*.conf;
include /etc/nginx/sites-enabled/*;
add_header Strict-Transport-Security "max-age=7884008; includeSubDomains" always;

#Since we're here, let's enable gzip
gzip on;
gzip_vary on;
gzip_proxied any;
gzip_comp_level 6;
gzip_buffers 16 8k;
gzip_http_version 1.1;
gzip_types text/plain text/css application/json application/javascript text/xml application/xml application/xml+rss text/javascript;
Let’s Encrypt – Add SSL
# Enter email and make redirect to HTTPS
sudo apt install python-certbot-nginx
sudo certbot --nginx -d www.example.com -d example.com
Adding HTTP/2 Support
Just add “http2” in these sections of your /etc/nginx/sites-available/example.com
You should see “HTTP/2 200” in the response after running the curl command.
<span class="token keyword">listen</span> <span class="token punctuation">[</span><span class="token punctuation">:</span><span class="token punctuation">:</span><span class="token punctuation">]</span><span class="token punctuation">:</span><span class="token number">443</span> <span class="token keyword">ssl</span> http2<span class="token punctuation">;</span> <span class="token comment"># managed by Certbot</span> <span class="token keyword">listen</span> <span class="token number">443</span> <span class="token keyword">ssl</span> http2<span class="token punctuation">;</span> <span class="token comment"># managed by Certbot</span><span class="token comment"># command line</span> <span class="token function">sudo</span> systemctl reload nginx curl -I -L https://example.com# You should see HTTP/2 200 server: nginx/1.14.0 (Ubuntu) date: Wed, 26 Dec 2018 23:28:17 GMT content-type: text/html; charset=utf-8 expires: Wed, 11 Jan 1984 05:00:00 GMT cache-control: no-cache, must-revalidate, max-age=0
iFrame
WordPress requires iFrames for plugin details and installation results. Edit /etc/nginx/snippets/ssl-params.conf
# add_header X-Frame-Options DENY always;
add_header X-Frame-Options SAMEORIGIN;
Install Redis
Keep in mind just because you restart Redis doesn’t mean it won’t start up with data. Depending on how you have it configured – Redis might’ve snapshotted some data. Make sure you run “redis-cli flushall” if you want it cleared. This could cause funky things to happen – especially if you have CSS links to a CDN.
<span class="token function">sudo</span> <span class="token function">apt-get</span> <span class="token function">install</span> redis -y <span class="token function">sudo</span> vim /etc/redis/redis.conf#add this to the bottom. This specific server has 2GB of memory. maxmemory 200mb maxmemory-policy allkeys-lru # Also, comment out the following lines in redis.conf. # This will ensure a 100% memory cache. #save 900 1 #save 300 10 #save 60 10000<span class="token function">sudo</span> systemctl restart redis-server

Enable Cache-control
Add this above your server block in the /etc/nginx/sites-available/example.com configuration file. Be sure to enter the one-liner in the server block as well.
map $sent_http_content_type $expires {
    default                    off;
    text/html                  epoch;
    text/css                   max;
    application/javascript     max;
    ~image/                    max;
}

server {
  root /var/www/example.com/;
  index index.php index.html index.htm index.nginx-debian.html;
  expires $expires;
Enable Nginx FastCGI Cache
Huge speed gains with Nginx FastCGI cache.
sudo mkdir -p /var/cache/nginx/fastcgi-cache/cache
Edit /etc/nginx/nginx.conf in the “http” block. Size (256m) has to be less than your RAM + swap space. You may also want to use your tmpfs mounts (such as /run) to run the cache in memory. Just be careful what you set your maximum value at.
fastcgi_cache_path /var/cache/nginx/fastcgi-cache/cache levels=1:2 keys_zone=fastcgizone:256m max_size=2g inactive=60m use_temp_path=off;
fastcgi_cache_key $scheme$request_method$host$request_uri;
fastcgi_cache_lock on;
fastcgi_cache_revalidate on;
fastcgi_cache_background_update on;
fastcgi_cache_use_stale error timeout invalid_header updating http_500;
fastcgi_cache_valid 200 60m;
fastcgi_pass_header Set-Cookie;
fastcgi_pass_header Cookie;
fastcgi_ignore_headers Cache-Control Expires Set-Cookie;
Keep in mind you should have a separate cache path/zone for each virtual host. Now go back and edit the /etc/nginx/sites-available/example.com configuration file:
location ~ \.php$ {
  include snippets/fastcgi-php.conf;
  fastcgi_pass unix:/var/run/php/php7.3-fpm.sock;
  fastcgi_param SCRIPT_FILENAME $document_root$fastcgi_script_name;
  fastcgi_cache_bypass $skip_cache;
  fastcgi_no_cache $skip_cache;
  fastcgi_cache fastcgizone;
  include fastcgi_params;
  fastcgi_buffer_size 128k;
  fastcgi_connect_timeout 60s;
  fastcgi_send_timeout 60s;
  fastcgi_read_timeout 60s;
  fastcgi_buffers 256 16k;
  fastcgi_busy_buffers_size 256k;
  fastcgi_temp_file_write_size 256k;
}

set $skip_cache 0;
  if ($http_cookie ~* "comment_author|wordpress_[a-f0-9]+|wp-postpass|wordpress_no_cache|wordpress_logged_in") {
    set $skip_cache 1;
  }

  if ($request_method = POST) {
    set $skip_cache 1;
  }

  if ($query_string != "") {
    set $skip_cache 1;
  }

  if ($http_cookie ~* "comment_author|wordpress_[a-f0-9]+|wp-postpass|wordpress_no_cache|wordpress_logged_in") {
    set $skip_cache 1;
  }
Install Autoptimize and Async Javascript Plugins
Autoptimize and Async Javascript help cuts another second off the load time and further improves the scores below.
The only thing I would be careful of is Async Javascript, it might break certain things. You may have to add “async” or “defer” to some of your <script> tags manually. Excluding your theme will probably help as well. The performance is still worth it.
The “Aggregate all linked JS-files to have them loaded non-render blocking? If this option is off, the individual JS-files will remain in place but will be minified.” setting in particular improves performance – but may cause a few errors. It shaved about 1.5 seconds off (HUGE!).
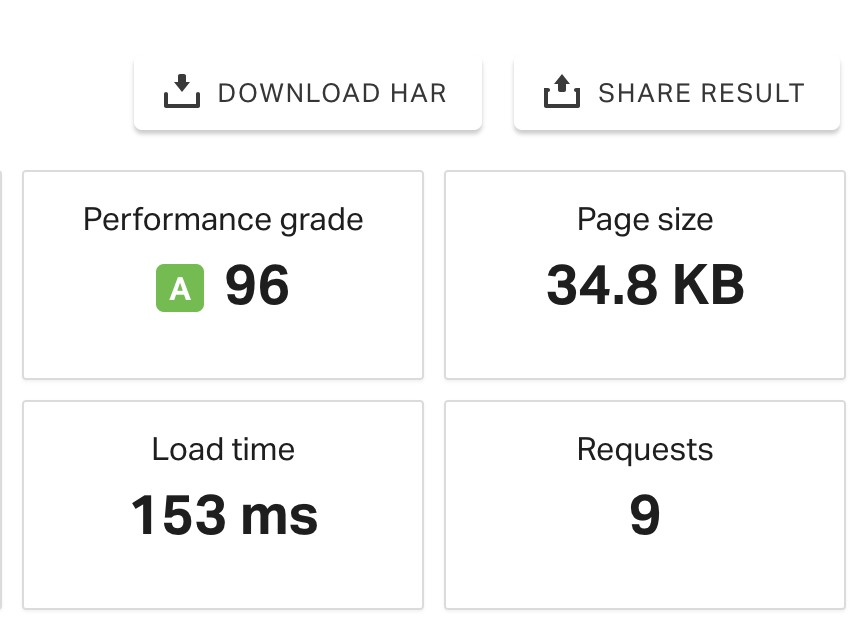
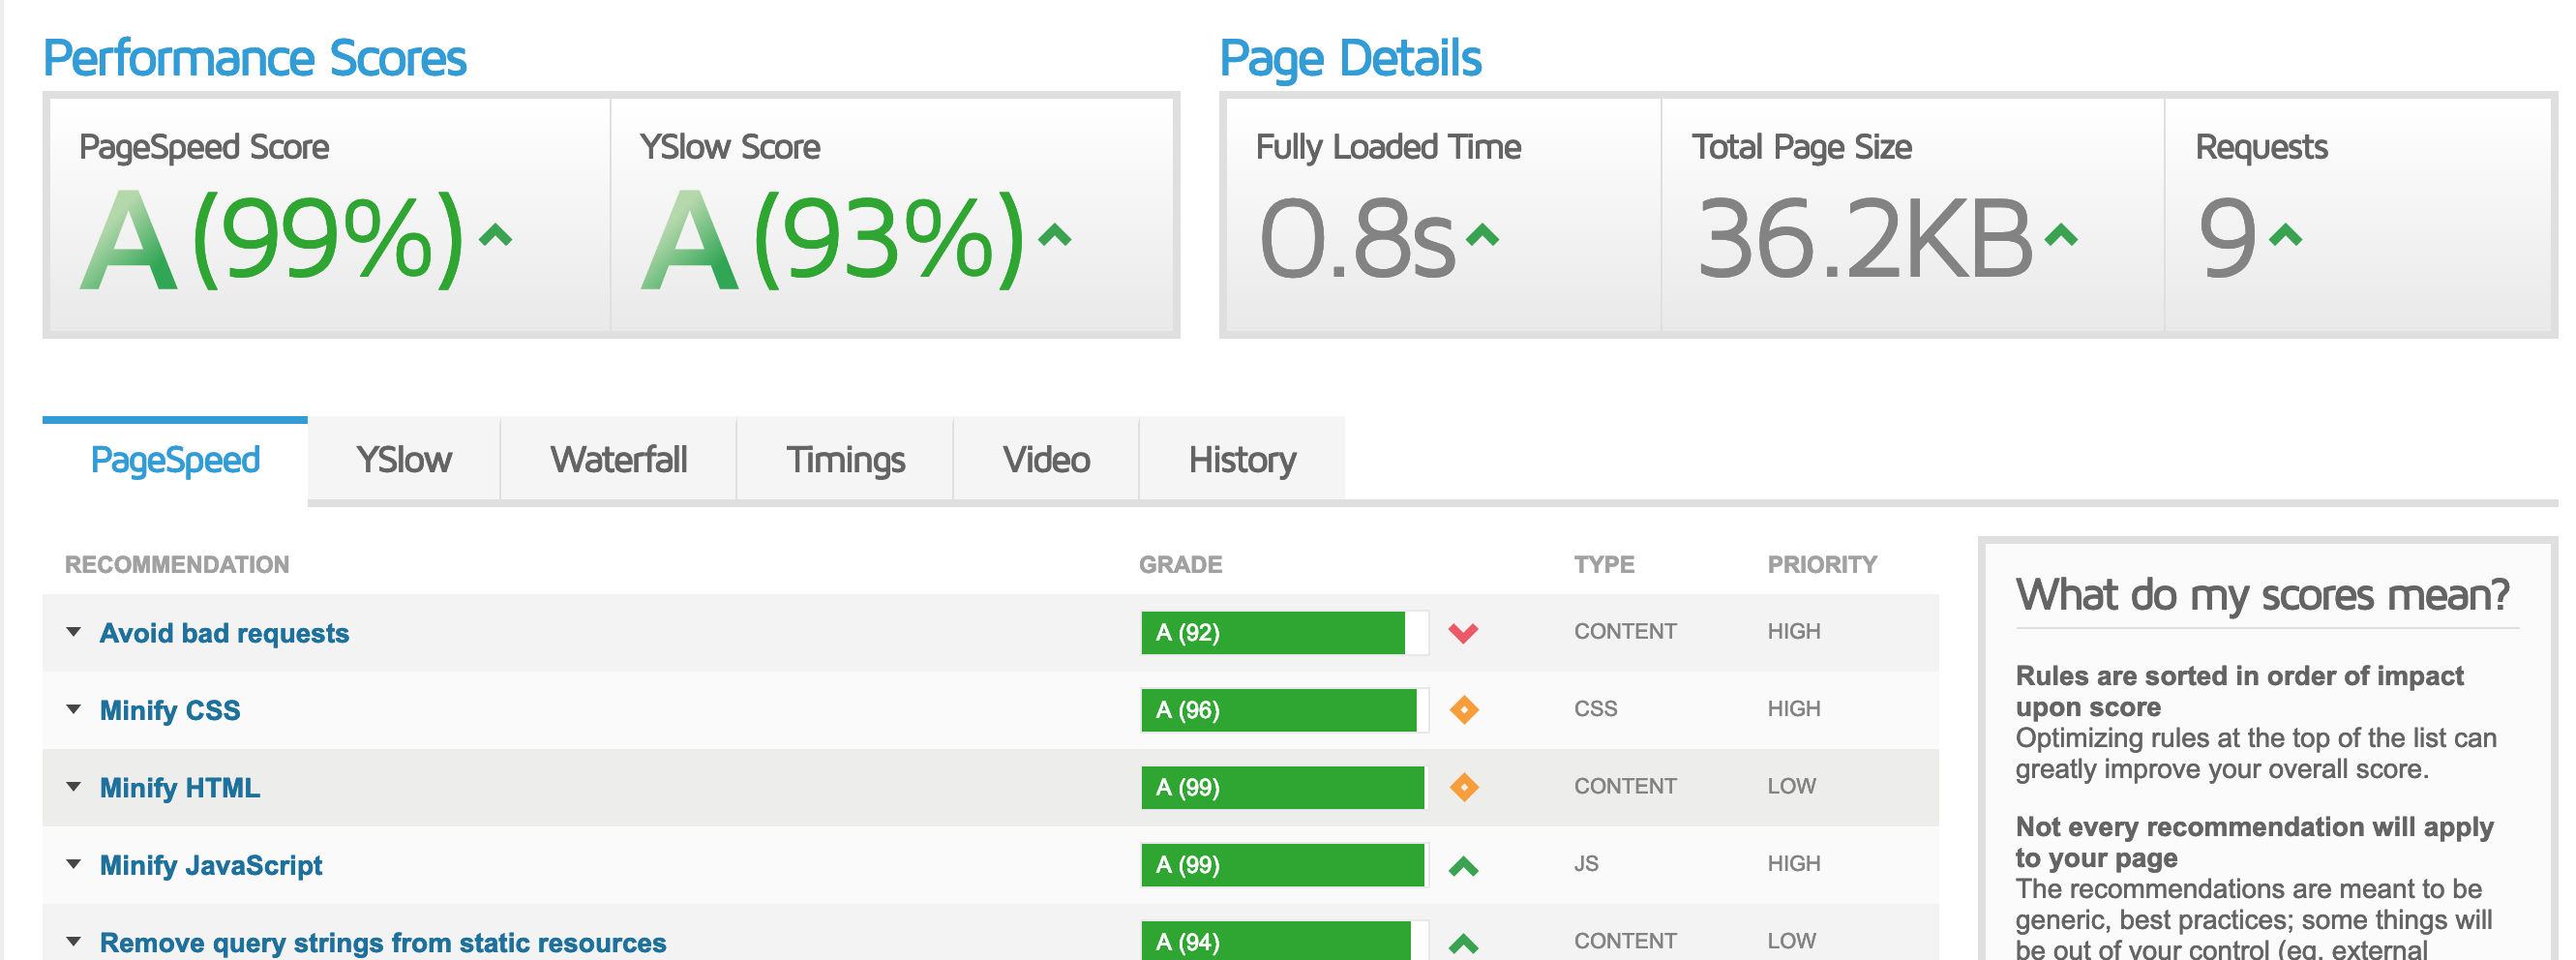
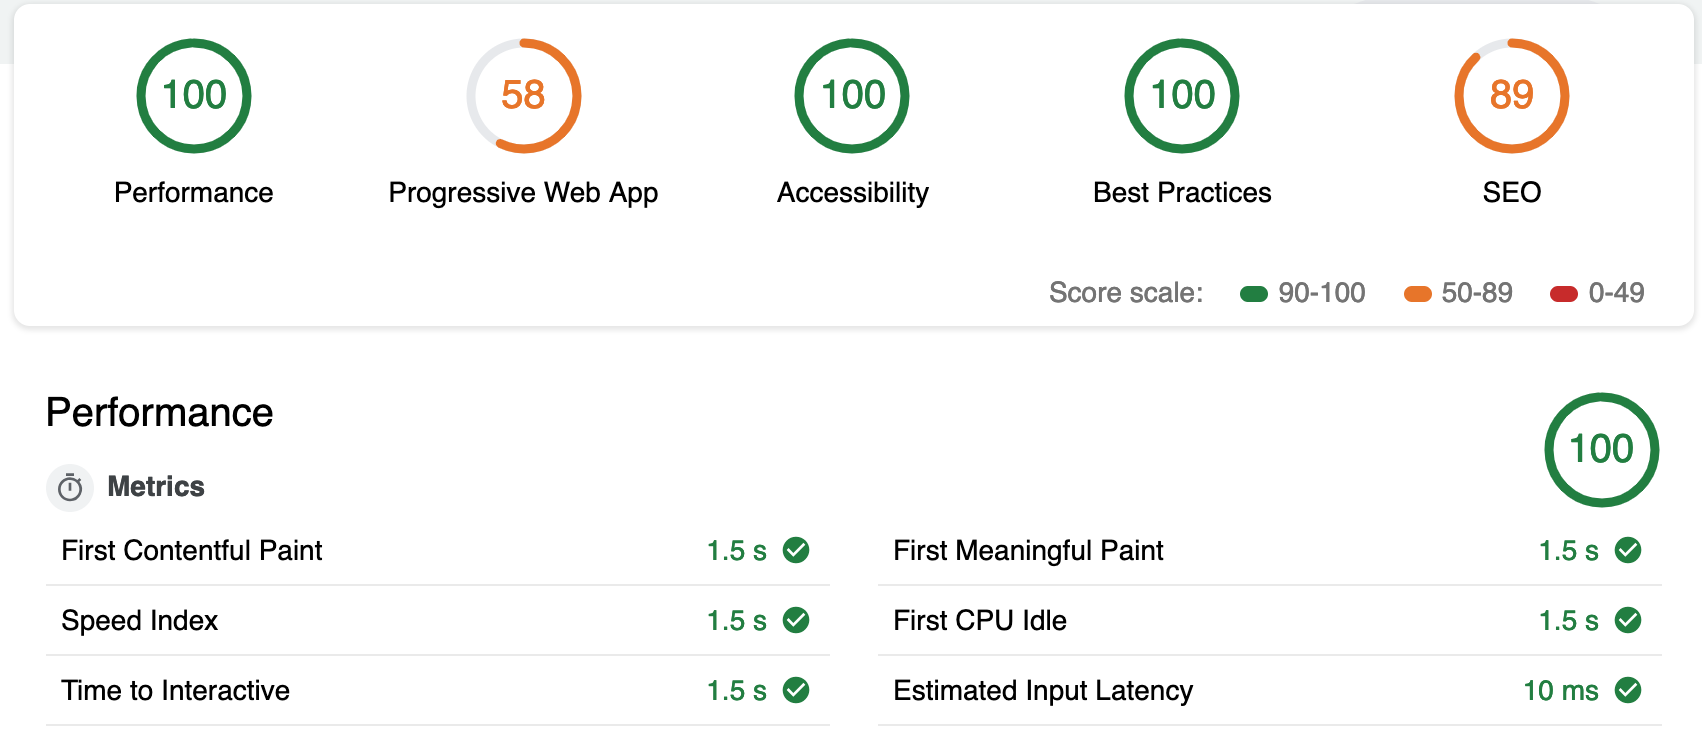
Results (with default theme):
I’ll do more testing with CDNs but this is a great way to maximize the utilization of your VPS.


Recent Comments